First off, HAPPY NEW YEAR! Anyway, I’m a keyboard nerd. Everyone who knows me already knows this. I mean, I have an r/MechanicalKeyboards sticker on my car! I’ve built around 8 or 9 keyboards on my own. It’s a hobby I never really saw myself getting into, but when I did, I got into it hard. I currently have 12 keyboards and countless key cap sets.
One of the things that really drew me to building custom keyboards was the ability to program custom layouts using the QMK Frimware. I liked the thought of having full control over what each and every key did when I pressed it or held it or double tapped it or whatever. Over the past few years I’ve messed around with a few different layouts until I finally settled on one that I liked1 So I’ll share that one with you now!
My Custom Keyboard Layout for my Tada68
Note: This is currently only the layout for my Tada68 because that is the keyboard that I use with my laptop. It has Mouse control keys so that I can set it on top of my Thinkpad’s keyboard and not be too upset that I’m covering the ThinkPoint.
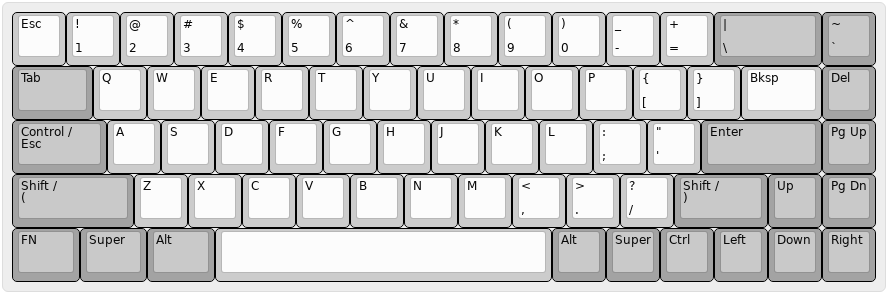
Layer 0: The Base Layer
This is the base layer. The normal typing layer. It’s pretty much the same as every other keyboard as far as the keys go. I have made a few changes like swapping the Backspace key and the |\ key. I find it easier to hit backspace with this layout. I have also changed the Caps Lock to function as ESC when it’s tapped and Ctrl when it is held. This has been an amazing quality of life change. One that I didn’t know I needed until I changed it. Making the Ctrl key easily accessible with my pinky from the home row makes using keyboard shortcuts a breeze. I also made the Shift keys Space Cadet Shift keys. So when they are tapped the left Shift will send ( and the right will send ). It’s just another little quality of life change. I replaced the normal Ctrl key with my FN key. More on that in a minute.
Layer 1: The Function Layer
Now this is where things really get interesting – and a little overwhelming. This is the function layer. The hilighted keys below and the keys that do something different when pressed in combination with the FN key.
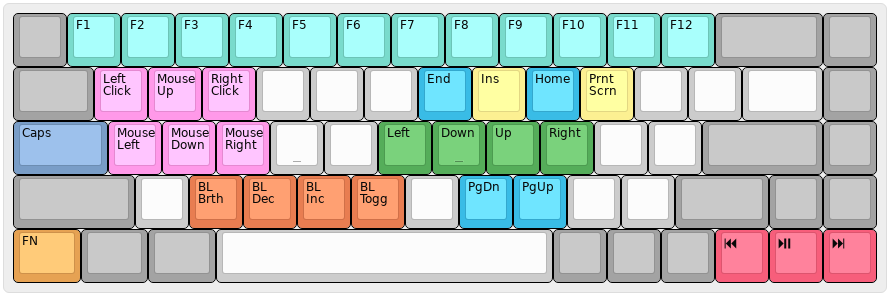
As you can see above, there is a lot going on. But let me break it down a bit. So since the Tada68 is only a 65% keyboard, it is missing some of the keys on a standard 144 key full size keyboard. I have to make up for that using a Function layer. So when I hold the FN key and press one of the number row keys it acts as the corresponding F key. So pressing 1 will send F1, 2 will send F2 and so on. Since I removed the CapsLock key on my Base Layer I decided to add it back where it normally belongs on my Function Layer. That way if I have to yell at someone, I still can.
Like I mentioned before, this keyboard will sit on top of my laptop’s keyboard making it impossible to use the ThinkPoint. So in the event that I need to move the mouse around I can do so by holding FN and pressing either W A S or D depending on the direction I want the mouse to go. I use i3 on my laptop as my Window Manager, but I’m still a bit of a mouse noob so sometimes I still use it and this makes it possible without moving the keyboard off of my laptop. The Q and E keys work as Left Click and Right Click respectively. It’s not the best solution but it gets the job done.
Under the mouse keys you’ll see the backlight control keys. My Tada68 has purple LEDs under each key so these control the light. BL Brth toggles the “breathing” mode. BL Dec decreases the brightness and BL Inc increases it. BL Togg toggles the lights either on or off.
Next to that we have some Navigation keys. H J K L become Left Down Up Right to emulate the Vim navigation keys. This is actually something I’ll have to get used to since I’m normally a Dvorak user and these keys are normally in very different spots, I might actually remove this later but I’m not sure yet. Above the “arrow” keys you’ll see End, Insert, Home, and Print Screen. Below the “arrow” keys you’ll see Page Up and Page Down. Simple enough.
Then all the way in the bottom right of the keyboard, where the normal arrow cluster lives, you’ll see the media control keys. I can’t seem to live without these since I listen to a lot of music while I sit at the computer writing blog posts or learning new things. It’s just nice to have them there.
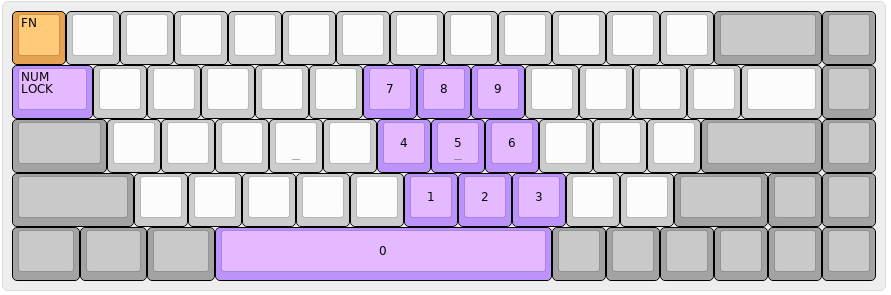
Layer 2: The Number Pad Layer
Now this last layer is actually something I stole from my good friend Hund. It’s a number pad layer. Since I obviously don’t have a number pad on the side my my 65% keyboard, I needed to add it in later. A lot of laptop keyboards do this when you hit the Num Lock button and I’ve seen it on other keyboards but I never really tried it myself. It wasn’t until reading Hund’s blog that I really decided to try it. When the ESC key is held it trigger’s the layer making the normal number pad layout easy to use with my right hand. I also made the Tab key become the Num Lock key because I don’t always remember to turn it on. I think I could add something in some config files on my computer to turn it on at start up but this was easier for me.
Conclusion
So there it is. My Tada68 custom keyboard layout. If you are interested in the actual keymap.c file so you can look at the actual code for the layout, you can check it out over on my GitLab. I plan on making a Pull Request to get it updated on the official QMK GitHub at some point. As always feel free to leave a comment below or contact me on Twitter, Mastodon, Email or via XMPP. Happy New Year everyone!
-
For now at least. ↩︎