
Recently I built a Mercutio keyboard. It’s a little through hole 40% keyboard. It’s pretty cute and I really like the way it looks. This isn’t my first 40% that I’ve built. The first one was a Planck but I could never get used to the “ortholinear” layout so it has mostly collected dust on my shelf. I’ve wanted to try a staggered 40% for a while now but I couldn’t justify the price for a lot of the kits. Then one day I got a Discord notification that the Mercutio was in stock. I think the group buy had extras or something, I don’t remember. I thought to myself, “eh, lets check it out.” and found out that the kit started at only $55. “Well, that’s reasonable!” I though so I purchased one. I also decided to order some 7305 MillMax Sockets to make it hot-swappable. Once it arrived, I got to building.
What is the Mercutio
The Mercutio is a through hole 40% keyboard. It has an FR4 sandwich mount style case. “What is FR4?” you might ask. Well as seen on the FR-4 Wikipedia page:
FR-4 (or FR4) is a NEMA grade designation for glass-reinforced epoxy laminate material. FR-4 is a composite material composed of woven fiberglass cloth with an epoxy resin binder that is flame resistant
Oh cool, so what does that mean? Honestly, I’m not too sure. I know that in the context of keyboard plates it gives the plate a little more flex than something like aluminum or brass, but honestly, that’s about all I know.
What is Sandwich mount? In a sandwich mount keyboard the screws go fully through the bottom housing, plate, and top housing of the keyboard, holding the plate like the middle of a sandwich.

The Mercutio is slightly different than the normal sandwich mount because the “top frame” and the “plate” are the same piece. But all-in-all it’s pretty similar.
I decided to go with the White FR4 case/plate and a blue PCB. I thought the colors would look nice together and I kind of wanted to put GMK Nautilus on it so I was thinking ahead. I opted for the black rotary encoder knob but ended up replacing it with a blue knob I found on Amazon.
I’ve never had a keyboard with an encoder before so I was looking forward to that, I’ve also never had a keyboard with an OLED screen and I had seen them in the past on keyboards like the Satisfaction75 from Canon Keys and thought it looked really freaking cool. Plus, Bongocat!
The Build Process
Building the Mercutio wasn’t unlike building most of my keyboards. It had the added step of soldering all of the components to the PCB because it’s a through hole kit, and adding the MillMax sockets added a little time as well. I managed to ruin a few of the sockets by getting solder into them and not being able to get it out. But after some desoldering and elbow grease I managed to get the whole thing put together. At the time of writing this (and the time of build) I am using Outemu Sky 67g switches lubed with Krytox 205g0. These were the first switches that I have ever lubed and it’s possible that I didn’t do a great job on them, but they are a delightfully tactile switch that I feel is pretty close to the feel of a Zelio switch. I must say, this is a really really nice looking keyboard. My wife thinks it’s the coolest keyboard that I’ve built to date and I think I have to agree with her. I love the look of through hole kits that have a little viewing area of all the components and the added satisfaction of building the entire PCB is pretty nice too. It’s not the most expensive keyboard I own, or the nicest typing experience, but I can’t help but love it. It’s just so much fun to use. But moving on…
Slight Problems
I ran into some slight problems with how the keyboard is by default. The default layout of the Mercutio makes it really easy to use normal base kit modifier keys, which is really nice… if you aren’t a Dvorak typist. In the normal QWERTY layout the home row keys consist of A S D F G H J K L ; " which is fine with the default layout.

As you can see, the default layout excludes the ; and " keys. It makes it look really clean with the regular 2.25u Enter key. But in the Dvorak layout the home row consists of A O E U I D H T N S -. As you can see, the ; is replaced with S. S is kind of an important key to have so I had to opt for a 1.25u Enter so I could fit one more 1u key in the row. Alright, I solved that problem, although I don’t have a 1.25u Enter key cap, but I had another one in the same vein. The bottom row of Dvorak is ; Q J K X B M W V Z and again, I didn’t have enough keys on the bottom row to fit all the letters. I could have excluded ; but I felt that would mess with my muscle memory too much so I didn’t do it. Instead I made the right Shift key my Z key. I never use right shift anyway1.
My Layout
The base for my layout was taken from Jonavin’s amazing Mercutio layout. Here are the features of their layout from the git page
Jonavin’s Custom Mercutio Layout
- Based on Fancy keymap
Features
- Split Enter, shftEnter, Split Backspace
- standard shorten home row keys
- numpad and nav keys in RAISE LAYER
- symbols in LOWER layer
- CAPS LOCK 2 taps for RAISE layer toggle
- RAISE layer left spacebar Backspace
- Shift+Encoder for layer changes (from mercutio/fancy keymap)
- MOUSEKEYS is disbled
- shutdown oled when powered down to prevent OLED from showing Mercutio all the time
- add WPM indicator when wpm is > 20 wpm
- add double tap of Left Shift to toggle Caps Lock
- add WinLock feature with FN + Win; display WL on OLED when enabled
- FN layer has encoder selectable key codes and displayed on OLED
Now, I edited this to fit my own needs. First of all, I added a full size Space Bar, changed everything from QWERTY to Dvorak, changed the shftEnter to Z as stated above, and moved Enter back where it “should” be. I also changed a few aspects of how the encoder works. By default the encoder works as a volume knob on the default layer. I changed this to be Up and Down to be used for scrolling webpages and such. Also when pressed it is F24 which I use to mute my mic on Discord. Other than that, the encoder is the same as Jonavin’s layout because I really liked how they have it setup.
Here are some images of my layers for you visual people out there.
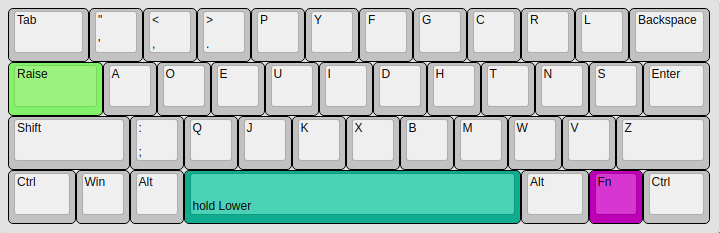
Layer 0: Default Layer
Layer 1: FN Layer

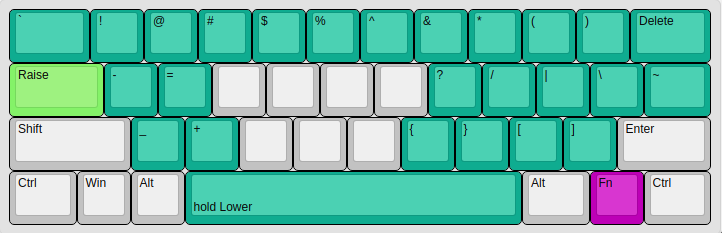
Layer 2: Lower Layer
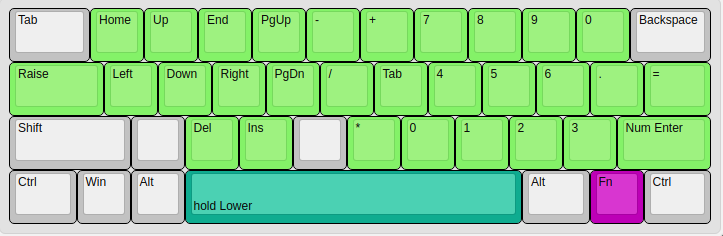
Layer 3: Raise Layer
Using As A Daily Driver
“How the hell do you use this nonsense daily?!” you might be asking. Well, it’s actually not terribly hard to get used to. After using it for a few days it becomes pretty natural. Getting used to it for doing the VERY BASIC coding that I do every once and a while is hard. I sometimes forget where some of the symbol are, but I bet if I keep using it that will become a non issue. Using it for gaming though is (at least for me) impossible. Not having a number row really kills me as most of the games I play are FPS and I need the number keys to switch weapons, heal, what-have-you. For now when I game I’ll be using something else. But for normal day to day use this is more than enough for me. I know there are people out there that use 40% keyboards for programming and I am amazed by those people because I can’t imagine that’s very productive but what to I know?
Conclusion
That’s pretty much my experience using a 40% as a daily driver. I love my Mercutio and I love staggered 40% layouts. I think they look great and have just enough keys for my day to day. That being said, I’ll probably still be sticking with a 65% most of the time, at least while I still game a lot. But the Mercutio has earned a permanent place on my desk as the keyboard for my streaming PC. It doesn’t take up much room and it has everything I need. And like I said, my wife also thinks it’s the coolest keyboard I’ve built so far, so there’s that. Thanks for reading, everyone.
-
This isn’t entirely true. On my normal keyboards I use the right shift to type
)↩︎